The easy way to install timber flooring
Welcome to our simple guide for installing your new timber floors.
Welcome to our simple guide for installing your new timber floors.
*Note that glue down installation is only recommended for seasoned DIYer's or professionals.
Check for signs of moisture in your subfloor using a calibrated moisture metre. Moisture content must be;
Using a straight edge tool check subfloor is level according to relevant industry standards, no more than 3mm deviation over 3m. Floor preparation and levelling may be required before installing your floors.
When you've received your timber floors it is essential to acclimatise them in the centre of the room before installing.
Up to one week’s acclimatisation is essential in areas that are particularly humid, cold, wet, hot or dry. Boards installed in a humid environment will naturally grow, hence the requirement for acclimatisation in areas such as QLD.
Room temperature is between 15-30 degrees and humidity levels are between 30%-70%.
All installed boards will be considered as accepted by the installer and/or homeowner, therefore it is essential that the boards be thoroughly checked pre-installation, with adequate lighting. Boards should be checked for the following prior to installation;
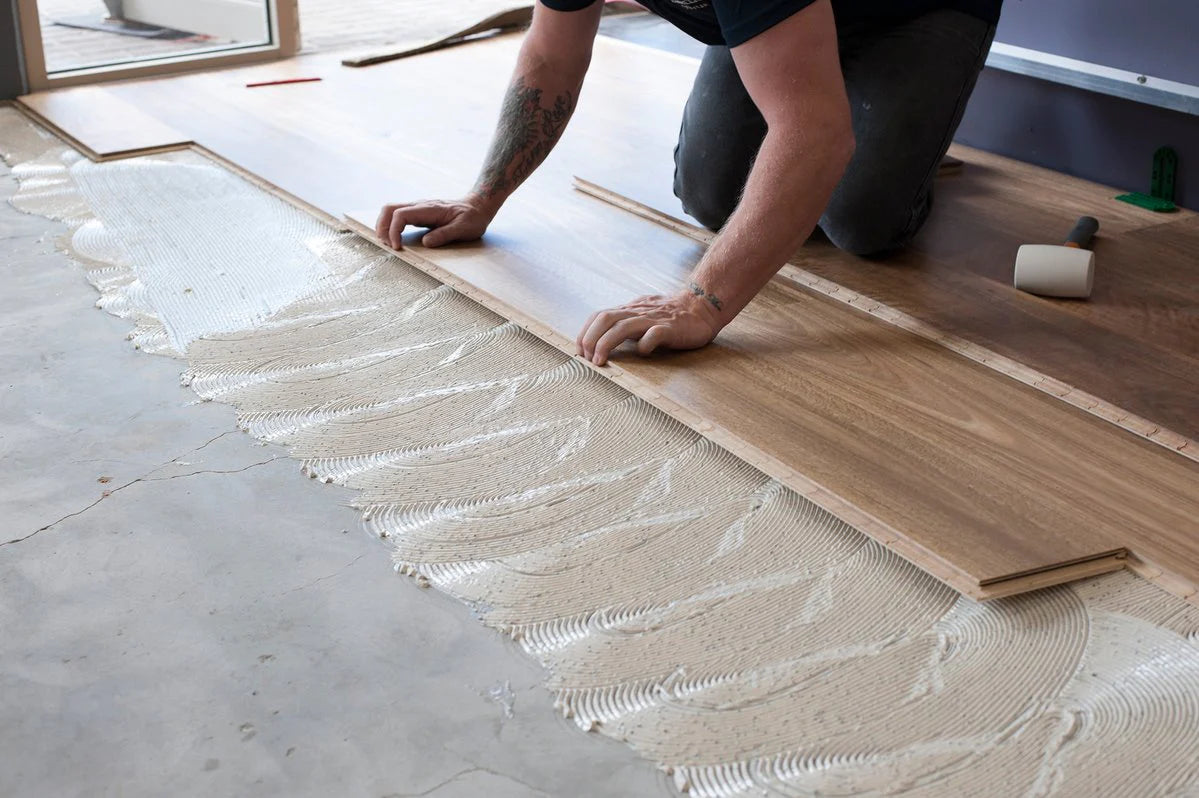
We always recommend glueing down our timber floors for optimal performance, quietness and longevity.
Note: All timber flooring with Tongue & Groove (T&G) Locking Systems are to be installed by a professional flooring installer.
Set up your installation tools and open multiple packs to pre-select boards that blend best with matching scotia, skirts and trims.
Check door and door frame clearances to ensure that doors will move freely without contacting the floor surface.
Although timber floors can be installed in any direction, as a rule, they are usually installed perpendicular to a window. Installing the floor parallel to the longest wall tends to make a room appear larger.
Know your maximum raft size, before floor expansion is required.
Tip! Stagger boards to ensure a more favourable overall appearance of the floor. When installing boards of random length, ensure that the staggered length is at least 20cm. End boards must be greater than 30cm in length.
If you are floating your timber floor, you will need affix Scotia or reinstall your skirting boards around the perimeter of your room to conceal the expansion gaps. For glued down timber floors the expansion gaps can be concealed with flexible caulk.
Congrats, you did it! Before you kick back and admire a job well done, don’t forget to snap some photos and share your new floors. Tag us on Instagram @flooringonlineau to really make our day.
Our experienced team are here to help on 1800 718 427 or chat with us online.
If floating your timber floors, it is essential to include an underlay as part of your floor preparation.
Nested lengths are boards that are shorter in length, and ensure your floor develops the desired staggered aesthetic.
Yes, you will need access to a saw to cut lengths of boards as well as door jambs.
Subscribe for new floors, interior tips and home tours
Postcode not found, please try again